Cleaning

Riven Chinese Slate Floor Before After Cleaning Shipdham

Renovating a Water Damaged Riven Chinese Slate Floor in Shipdham

Slow leaking underfloor pipes are guaranteed to wreck the look of an expensive tiled floor and this is exactly what had happened at our client’s house in the village of Shipdham. The problem occurred in the Kitchen and due to the slow nature of the leak it was some time before the problem was diagnosed and repaired. This resulted in a huge damp problem affecting the riven Chinese Slate tiled floor, damaging the sealer and resulting in white efflorescence salts being regularly deposited across the whole area.

The old kitchen units had been removed and the floor partially excavated to access and repair the leaking pipework, after which a new section of slate tiles had been re-laid. The new and the old sections were noticeable, and part of my job would be to clean the old tiles to a standard where they would blend in with the new.

Riven Chinese Slate Floor Before Cleaning Shipdham

Cleaning a Riven Chinese Slate Floor in Shipdham

The first job was to deep-clean the floor using a strong solution of Tile Doctor Pro-Clean mixed with a small quantity of Tile Doctor Remove and Go, which would help to dissolve the damaged sealer. This poured onto the floor and left to soak in for ten minutes before being scrubbed into the slate with our rotary machine fitted with a brush attachment. This brush scrubs right into the uneven surface of the tiles and makes light work of what can be quite a physical job. This process releases a lot dirt and old sealer from the tile which is effectively removed using another machine that gives the floor a power rinse at the same time.

The grout lines and parts of the riven surface which were still soiled were cleaned by hand using angle head brushes and Tile Doctor Oxy-Gel, which is a concentrated version of Pro-Clean in gel form which makes it a lot easier to contain in a small area. Having satisfied ourselves that the floor was finally clean, we left it to dry thoroughly overnight with assistance from our dehumidifier.

Sealing Riven Chinese Slate Tiles in a Shipdham Kitchen

On our return the following day, we damp tested the floor and found that the moisture content was a little higher than we would have liked and this would certainly cause a problem with the standard Tile Doctor acrylic sealer which is water based. In our experience water-based sealers are often only successfully applied if the conditions are ideal and the moisture content of the stone is very low. We chose, therefore, to use a slightly different product in the form of Tile Doctor Seal and Go Extra which is microporous and has a higher acrylic solids content than the standard product, making it ideal in situations where dampness in the tile is an issue but the client wants a sheen finish to make daily maintenance easier.

Six coats of Seal and Go Extra were applied in total, the result had the sheen finish the client wanted and the sealer enhanced the different colours in the slate in the process. The sealer will provide excellent on-going protection and being a fully breathable sealer, it will not be impacted by any damp issues as the floor dries out completely over time.

Riven Chinese Slate Floor After Cleaning Shipdham
With the work completed it the whole floor looked great and it was difficult to spot the repair, our client was certainly happy with the result and made the following comment:

Fantastic service and outstanding results. Our slate floor looks amazing. Very happy
Clair R, Shipdham

Deep Cleaning and Sealing an Old Slate Tiled Floor in Norfolk

Renovating a Water Damaged Riven Chinese Slate Floor in Shipdham Read More »

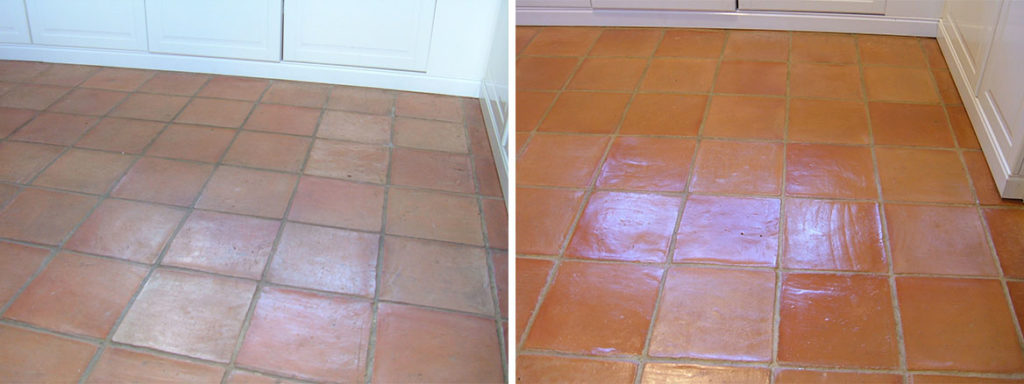
Terracotta Tiled Kitchen Floor Before After Cleaning Hales

Dirty Terracotta Floor Tiles Cleaned and Sealed in Hales

How the Terracotta floor tiles at this property in the Village of Hales, Norfolk became quite so comprehensively dirty in so short a time, we will never know. We were contacted by the new owner, a lady who had become so distressed by the state of the floor in the house she had recently bought that she was seriously considering ripping up the entire area of tiling and replacing it. Remarkable particularly because the property had been restored only a couple of years ago, the kitchen and hallway being laid with new terracotta tiles.

The entire surface was deeply ingrained with soiling and the pointing lines were filthy, despite there being evidence of some kind of topical sealer having been applied at the time of installation. It quickly became obvious during testing that the sealer had been applied very sparingly and had mostly worn away, leaving a badly compromised fluid and soiling resistance with a dull and dirty finish which refused to clean up when mopped.

Terracotta Tiled Kitchen Floor Before Cleaning Hales

Deep Cleaning Terracotta Floor Tile in Hales

The tiles turned out to be made of a fairly soft terracotta which meant that we were able to deep-clean them extremely effectively using a strong dilution of Tile Doctor Pro-Clean (one part Pro-Clean to two parts water). A strong dilution was required to remove what remained of the old sealer in the less used areas and strip the surface back to the bare tile.

The Pro-Clean was left to soak into the floor for about ten minutes before being worked in using our heavy rotary machine fitted with a black scrubbing pad. The resulting slurry being power rinsed and vacuumed away with our 400psi Ninja machine. All the dirt and virtually all of the old sealer was removed at this stage; the remaining patches around the edges of the area being finished by hand with a 200-grit hand-held burnishing block. The pointing lines were then cleaned by hand with neat Pro-Clean and an angled grout brush.

Finally, the deep-seated oil stains in front of the cooker were brought out using Tile Doctor Oxy-Gel which was left to dwell on the marks for an hour before being agitated with a diamond burnishing pad and rinsed away with the Ninja machine. The floor was then left to dry thoroughly overnight with assistance from our dehumidifier.

Sealing Terracotta Floor Tile in Hales

Owing to the softness and consequently high porosity of the substrate, we realised that it could take up to ten coats or more of our chosen sealer in order to achieve the level of shine our client had requested so that the daily mopping would be effective.

Our usual solution to enable us to complete the work in one day would be to apply a coat of penetrating Tile Doctor Colour Grow sealer to the tiles first, followed by up to five coats of topical sealer which would provide the finish, but because our client loved the new lighter colour of the cleaned tiles, Colour Grow was not an option as it is designed to enrich and thereby slightly darken the colour.

The solution therefore was to apply a single coat of Tile Doctor Ultra-Seal which, like Colour Grow, is a solvent-based penetrating sealer but doesn’t alter the colour of the material. This was followed by five coats of Seal & Go to further improve the fluid resistance and provide the mid-sheen finish required.

Terracotta Tiled Kitchen Floor After Cleaning Hales
At the end of the job we had a very happy client whose actual words were: “thank you so much for restoring my faith in my floor!”

Renovating Terracotta Floor Tiles in Norfolk

Dirty Terracotta Floor Tiles Cleaned and Sealed in Hales Read More »

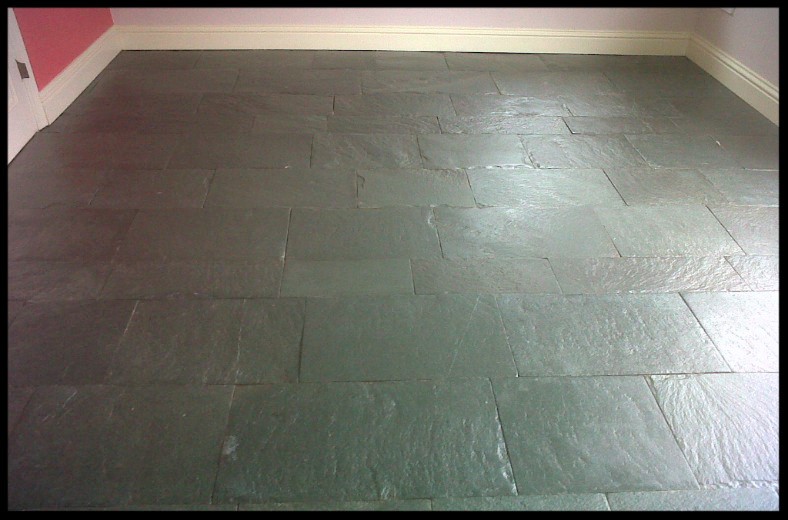
Slate Tiled Floor in Wreningham During and After Sealing

Renovating Reclaimed Slate Floor Tiles in Wreningham

When the old Rowntree Mackintosh sweet factory at Chapelfield in Norwich was closed down and eventually demolished, our client acquired a quantity of the beautiful green/black slate flooring tiles which had formed part of the reception area of the plant. They had laid these tiles edge to edge with no grouting in their large kitchen/dining room extension at their home in the village of Wreningham and the result was perhaps one of the most impressive examples of high-quality slate flooring we have ever seen in any location.

The Slate floor tiles had been protected against oil and fluid spillages with the application of a penetrating sealer after installation at the property but, over the ensuing years, there had been some inevitable degradation of the sealer and the entire area was now in need of a thorough deep-clean and reseal in order to remove the coating of general grime, bring out the strikingly deep colour and restore the stain resistance.

Cleaning a Slate tiled floor

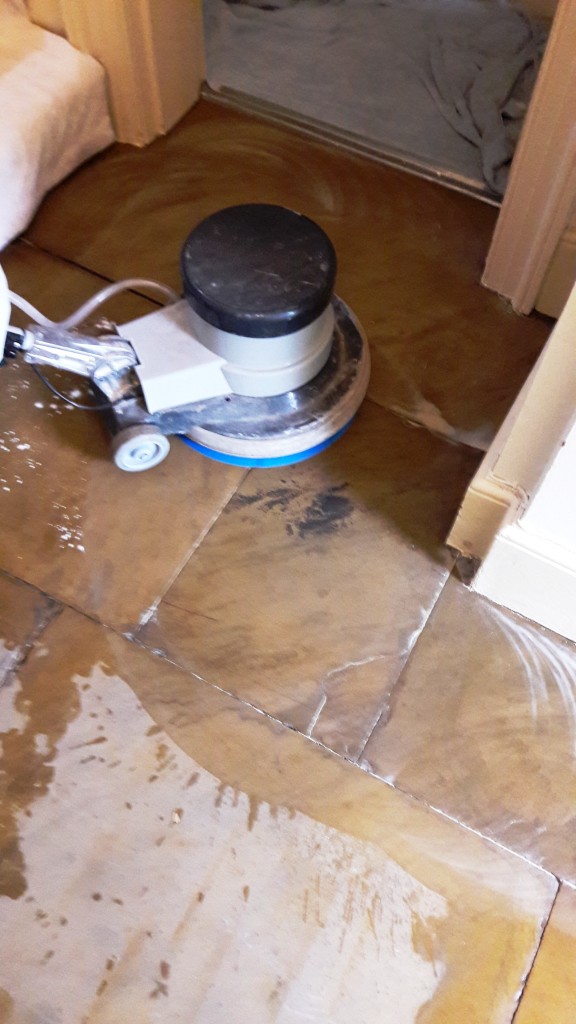
As there was no topical finish to remove, we proceeded to deep-clean the surface of the tiles using Tile Doctor Pro Clean at a less powerful mix ratio of 1-part water to 5-parts cleaner. This solution was applied to the tiles and left to soak in for ten minutes before being worked in using a black scrubbing pad fitted to our rotary machine.

The resulting muddy slurry was then power rinsed off the floor with water and then extracted with our Ninja machine which has a very powerful vacuum. The high pH product was so effective, no further cleaning was necessary.

The whole area was then dried thoroughly using two large industrial fans which dramatically reduced the drying time, enabling us to move onto sealing later that afternoon. We don’t normally recommend cleaning and sealing in the same day as the floor has to be dry before sealing however in this case we were able to progress through the cleaning process much quicker than anticipated.

Slate Tiled Floor in Wreningham During Sealing

Sealing a Slate Tiled Floor

Before sealing the floor was spot tested in different places using a moisture meter. All was well, so a single coat of Tile Doctor Colour Grow was applied to the Slate tiles. Colour Grow is a penetrating sealer that seeps into the pores of the stone protecting it from with and as its name suggests also intensified the natural black/green colours of the slate in the process.

Once the first coat was dried I followed up with three coats of Tile Doctor Seal & Go, which further enriched the colour and provided a pleasing mid-sheen finish to the floor surface.

Slate Tiled Floor in Wreningham During Sealing
The whole process really put the life back in the stone floor and the tiles which were once dull now look vibrant and colourful.

Deep Cleaning and Sealing an Old Slate Tiled Floor in Norfolk

Renovating Reclaimed Slate Floor Tiles in Wreningham Read More »

Yorkstone Hallway Restoration Carbrooke Finished Floor

Restoring a Carpet Covered Sandstone Hallway in Carbrooke

This was perhaps the most challenging restoration we have been presented with to date.
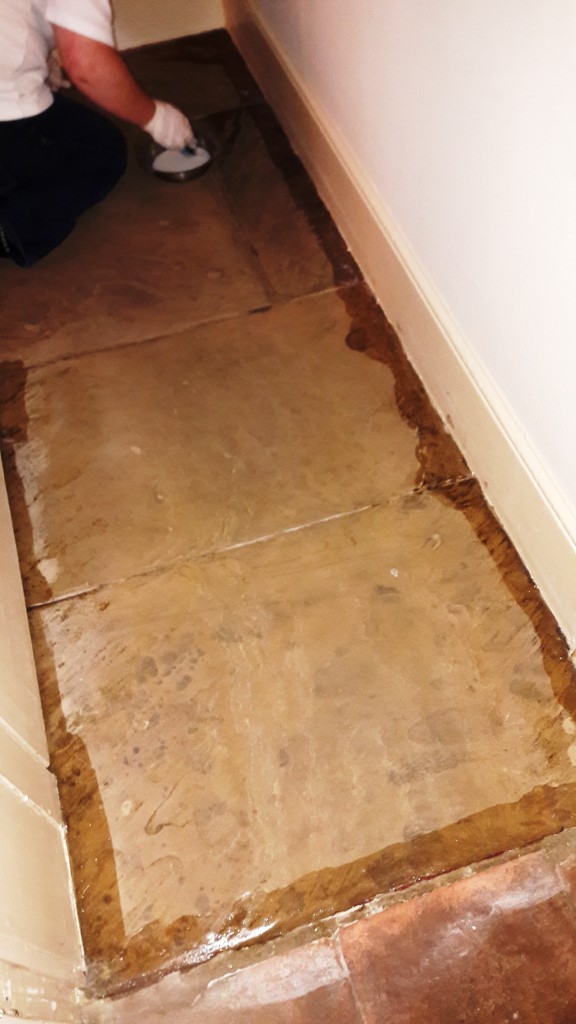
The work involved removing carpet and underlay from a long Yorkstone tiled hallway at a beautiful old Grange in Carbrooke on the outskirts of Watton and restoring the flagstones to their original glory. These pavers are a type of Sandstone, a carboniferous sedimentary rock consisting of quartz, mica, feldspar, clay and iron oxides quarried in Yorkshire and having a rich sandy colour with a slightly sparkling surface.

On lifting the carpet, we found, to our dismay, that the rubber-backed underlay had been firmly stuck down to the surface of the stone with what appeared to be a thick layer of yellowing impact adhesive which covered the entire area right up to the thresholds and skirting boards.

Yorkstone Hallway Restoration Carbrooke Carpet Removed Revealing Underlay Yorkstone Hallway Restoration Carbrooke Underlay Peeled Back Revealing Glue

Stripping Carpet Adhesive off a Sandstone tiled floor

Our first task was to remove as much of the underlay by hand using sharp-bladed scrapers and a heck of a lot of elbow grease. Having done this, the next step was to cover the remaining adhesive layer with a specialist water-based stripper which was applied by brush and allowed to react for an hour. The result was an incredibly sticky substance with the consistency of chewing gum which we had to painstakingly remove inch by inch with paint scrapers. This process had to be repeated twice as even the specialist stripper couldn’t cope with the sheer volume of goo in a single application. The floor was then left overnight to dry out and settle down.

Yorkstone Hallway Restoration Carbrooke Applying Stripper Yorkstone Hallway Restoration Carbrooke Scraping Away Softened Glue

The following day, we deep-cleaned the whole area using very strong mix of Tile Doctor Pro Clean and Remove & Go, scrubbed in with a rotary machine fitted with a black stripping pad. Four pads were used up in this process as they quickly became clogged with the thick slurry which was then power rinsed and vacuumed away from the floor. Any remaining patches of the glue were further softened using Tile Doctor Nanotech HBU Remover and carefully picked off by hand with the bladed scrapers.

Yorkstone Hallway Restoration Carbrooke Deep Cleaning Yorkstone Hallway Restoration Carbrooke Stone Surface After Deep Cleaning

Finally, the slabs were finished using a brush fitted to the rotary machine with 320 grit honing powder to achieve a smooth, silky and very clean surface before being power rinsed with plenty of clean water. Again, the floor was left to dry thoroughly overnight with the assistance of our large capacity dehumidifier and thermostatic hot air blower.

Sealing a Sandstone tiled floor

Returning the following day, we found that the dehumidifier and heater had done their job and the sandstone was ready for sealing, the moisture content having been brought down to an average of 10% overall as shown by our damp meter testing.

The client had requested a light shine on the floor so that it would be easy to maintain on a daily basis. We chose, therefore, to use Tile Doctor Seal & Go, a combination sealer with a mid-sheen topical finish, which we applied using paint pads and microfibre cloths in five thin coats, resulting in an excellent fluid resistant seal with a lustrous shine.

Yorkstone Hallway Restoration Carbrooke Applying Sealer To Edges Yorkstone Hallway Restoration Carbrooke Finished Floor

This was a tough job but a highly satisfying result, further emphasised when the client’s antique furnishings were placed in situ.

Deep Cleaning and Restoration of a Sandstone Hallway in Norfolk

Restoring a Carpet Covered Sandstone Hallway in Carbrooke Read More »

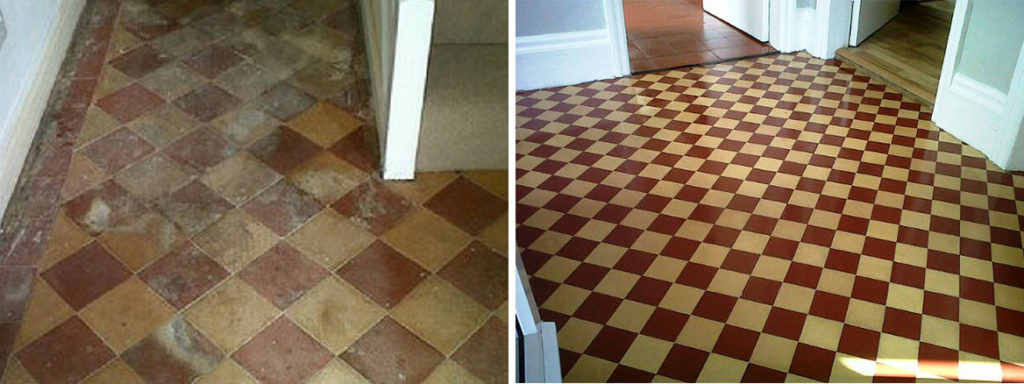
Victorian Hallway Floor Tiles Before After Cleaning Norwich

Restoring Neglected Victorian Hallway Tiles in Norwich

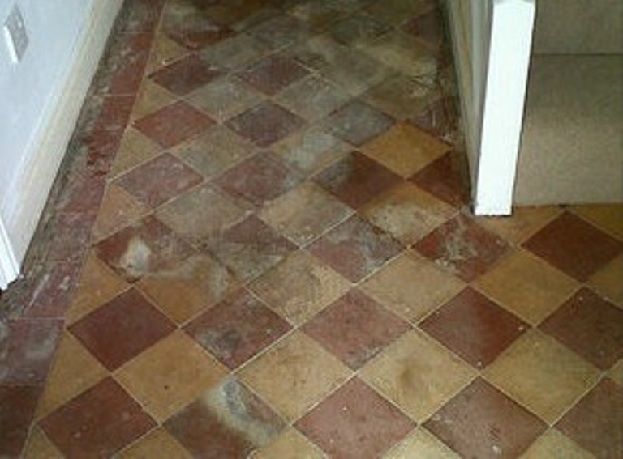
There are thousands of Victorian tiled hallways in and around Norwich and I often get called to work on them, however this was a particularly abused and neglected example I thought you might find interesting. The surface had clearly been both painted red at some point (possibly with an old lead-based paint) and then completely covered with rubber-backed underlay and carpeted, a thick layer of double-sided carpet tape remaining firmly stuck in patches around all the edges of the floor area.

Victorian Hallway Floor Tiles Before Cleaning Norwich

Cleaning a Victorian tiled floor

Firstly, we cleaned the whole area using a strong solution (1:3) of Tile Doctor Pro-Clean, which is a high alkaline stripper and cleaner, agitated with a black scrubbing pad fitted to a rotary machine. All products and slurry were then power rinsed and vacuumed away to reveal the improved floor.

There were still a significant number of glue patches and paint spots around the edges of the floor, so these were tackled using Tile Doctor Remove & Go, which softened them enough to enable us to remove them with a sharp-bladed scraper.

Unfortunately, the decaying rubber underlay had left a pattern on the tile surface which was most obvious at the doorway into the terracotta tiled kitchen. We almost completely removed this using Tile Doctor Oxy-Gel which being in gel form allows it work on the problem area longer. It was painted on a brush and kept moist for two hours under a layer of cling film which drew out virtually all the contaminant from the tile.

The next concern was that an original Victorian floor of this age would almost certainly have no damp proof membrane and an area near the front door which showed evidence of efflorescence salts was treated with Tile Doctor Acid Gel in order to remove the white deposits and further inhibit the production of more in the future.

The whole area was then lightly buffed using the rotary machine and a 1500 grit diamond pad with water in order to remove any remaining fine paint spots and restore a silky feel to the surface of the tiles before leaving the floor to dry overnight with assistance from our dehumidifier.

Sealing a Victorian tiled floor

When we returned the following morning, our damp meter showed us that the moisture content in the substrate was probably going to be too high to allow us to use an acrylic sealer to provide the sheen which the client had requested; so we decided to spray-buff the floor using a 3000 grit diamond pad on the rotary machine followed by the application of Tile Doctor Colour Grow, a colour enhancing penetrating sealer which sits just below the surface of the tile and leaves no visible finish. Finally, the whole floor was spray buffed to a low sheen with a white maintenance pad on the rotary machine and any resulting dust vacuumed away.

Victorian Hallway Floor Tiles After Cleaning Norwich
The Victorian tiles now look fantastic and have become a great asset to the property as original features like these are very sought after.

Deep Cleaning and Restoration of Old Victorian Tiles in Norfolk

Restoring Neglected Victorian Hallway Tiles in Norwich Read More »

Pamment Dining Room Floor Tiles Before After Cleaning Wymondham

Restoring an 18th Century Norfolk Pamment Tiled Floor in Wymondham

The client’s requirement for this particular job was to clean and restore a very old and porous Pamment tiled floor in the dining room of an old house in the Norfolk Market town of Wymondham. My client impressed upon me the need to restore the floor without removing any of its considerable character and to provide a high degree of fluid and stain resistance which I was confident would not be an issue having worked on similar floors before.

Pamment Dining Room Floor Tiles Before Cleaning Wymondham
The floor originally dated from the late 18th century and had clearly suffered many years of abuse and neglect; there was evidence that at one time, the entire area had been covered by linoleum which appeared to have been stuck down with a type of hide glue, leaving large patches of the adhesive firmly stuck to the surface of the tiles.

Pamment tiles are very popular in Suffolk and Norfolk homes and I often come across them; they are made from clay and, like Terracotta, are porous and therefore need to be sealed to prevent ingrained dirt. Pamments are quite versatile however and can be used for internal floors and external surfaces like patios.

Cleaning a Pamment tiled floor

The first stage of the renovation was to apply a strong dilution (1:2) of Tile Doctor Pro-Clean to the whole area which was scrubbed in with a rotary machine fitted with a black scrubbing pad. The resulting slurry was power-rinsed and vacuumed away using our Ninja machine which makes light work of these tasks.

Tile Doctor Remove & Go was then applied to the remaining patches of paint and glue and allowed to remain in contact for thirty minutes before being scrubbed again with the black pad and rinsed with clean water. A few particularly stubborn glue patches were finally dispatched by steaming after the application of Tile Doctor Nanotech HBU Remover. The cleaning being complete, the odd bits of missing pointing were replaced using a grey-coloured fast-cure compound and the whole area was left to dry thoroughly overnight with the assistance of our large capacity dehumidifier.

Sealing a Pamment tiled floor

Returning the following day, the floor was tested for moisture content using a damp meter to ensure that the chosen sealer’s performance wouldn’t be adversely affected by the presence of too much water in the substrate, particularly bearing in mind that there certainly wouldn’t be a damp proof membrane present in a floor of this age.

The dehumidifier has done its job and I was able to start the sealing process with a single coat of Tile Doctor Colour Grow which is an impregnating sealer that works by occupying the pores in the tile so dirt cannot. Colour Grow is also a moisture-tolerant, breathable sealer that has the additional benefit of enhancing the colours within this kiln-fired tile without affecting the look and feel of the surface.

Our clients had said that they would prefer a slight shine to the flooring if possible, so a further three coats of Tile Doctor Seal & Go were then applied to the whole area which provided maximum fluid resistance with a mid-sheen finish which would make daily cleaning much easier and more effective.

Pamment Dining Room Floor Tiles After Cleaning Wymondham
The client was really pleased with the transformation and left the following comment.
“Almost unbelievable; the results are far beyond what we hoped might be possible with our badly neglected dining room floor. Many, many thanks.”

Deep Cleaning and Restoration of Old Pamment Tiles in Norfolk

Restoring an 18th Century Norfolk Pamment Tiled Floor in Wymondham Read More »

Scroll to Top