Terracotta Tile Cleaning

Welcome to my Work History archive where you will find detailed examples of the cleaning and renovation of Terracotta tiles carried out in Norfolk

Cleaning and Renovating Terracotta Tiles

Terracotta tiles have been around in certain parts of the world for over two millennia, in fact the word Terracotta means burned earth. The ancient Romans used a variety of terracotta tiles in their villas and palaces for many centuries. Terracotta tiles are thicker than most modern tiles giving them strength and durability.

The one big downside to Terracotta is the fact that it has no glaze on the surface and being very porous can soon pick up and store muck and dirt very quickly. If you have ever owned a Terracotta floor before you will be able to relate to this problem however the answer is to ensure you have the correct sealer in place.

Traditionally Wax was used to protect terracotta tiles however with the advent of modern purpose made sealers we don’t recommend it. Not only is it troublesome to remove but it scratches easily and we have seen situations in kitchens where dirt and oil trapped in the wax turns black and becomes very unsightly.

For sealing Terracotta we actually recommend Tile Doctor Seal and Go which works well on clay tiles such as Terracotta and is also water based so doesn’t give off a smell as it dries. When applying a sealer always make sure the floor is dry first as applying a sealer to a damp floor can lead to inconsistent results. Because of this we typically clean and seal Terracotta floors over two days so we can clean on day one and then apply the sealer on day two having let the floor dry off overnight.

Below you will find detailed examples of work we have carried out in the past, it should give you some idea of what’s involved and what can be achieved with the right techniques and products.


Terracotta Tiled Floor Renovation Ostrich Inn South Creake Fakenham

Terracotta Pamment Floor Deep Cleaned and Sealed at South Creake Fakenham

This Norfolk Pamment tiled floor at the Ostrich Inn, South Creake near Fakenham is a good example of a floor badly contaminated as the result of extensive renovation works. Terracotta pamment clay is a very porous material and will easily absorb fluids and dirt if left unsealed and therefore unprotected.

Terracotta Tiled Floor Before Cleaning Ostrich Inn South Creake Fakenham

The solution is a topical or surface-finish sealer that will prevent dirt from becoming ingrained in the pores of the tile. The sealer does wear off over time however and once that happens, the tiles become very difficult to keep clean. The same thing happens with the sand and cement pointing lines so it’s very important to maintain the sealer on both the tile and pointing especially in a kitchen environment where spills and therefore staining is more likely to occur.

Terracotta Tiled Floor Before Cleaning Ostrich Inn South Creake Fakenham

I visited the property to survey the pamment floor and I could see the whole area, including the pointing, needed a complete strip and deep-clean followed by the application of a fresh combination sealer/acrylic finish. Due to its size and the logistics of furniture moving I could see the work would need to be done in two halves. I explained the process and conducted a small demonstration so they could see the results. Happy to proceed with my renovation plan we scheduled a date for the work to be done a few weeks later.

Stripping & Deep Cleaning a Terracotta Pamment Floor Near Fakenham

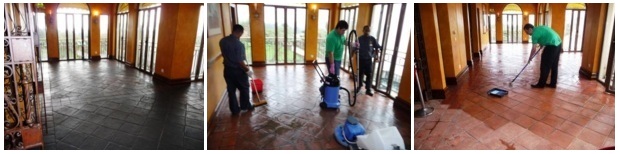
Cleaning started by spraying the Pamments with a strong 3:1 dilution of Tile Doctor Pro-Clean mixed with a little Tile Doctor HBU Remover to increase its cleaning power. After spraying the mixture onto the tiles and pointing it was left to soak in for around ten minutes, more solution being added periodically to prevent it drying out.

The floor was then scrubbed using a rotary machine fitted with a black scrubbing pad. This process took some time and in all, five litres of Pro-Clean was consumed in the cleaning process. This was really needed to remove the many years of dirt and building work contaminants which had built up on the floor. A wet vacuum was then used to remove the chemicals and resulting slurry.

Pro-Clean is a strong alkaline product so to rebalance the pH level of the floor it was then given a thorough rinse with a solution of Tile Doctor Grout Clean-Up. I like to do this as I don’t want anything affecting the curing of the new sealer later.

Sealing a Terracotta Pamment Floor near Fakenham

The floor was left to dry out overnight and a digital moisture meter was used the following morning to check it was dry. The results were fine and so I proceeded to apply the first of what would be five coats of Tile Doctor Seal & Go which is a water-based acrylic sealer that adds a subtle sheen finish.

Terracotta Tiled Floor After Renovation Ostrich Inn South Creake Fakenham

As it was a fairly large floor area it took five litres of the sealer to treat the whole floor and in total, we spent four days at the property. Satisfyingly, the clients were absolutely staggered and delighted with the results we had achieved with a floor they thought was beyond rescue.

Terracotta Tiled Floor After Renovation Ostrich Inn South Creake Fakenham

For maintenance cleaning I recommended Tile Doctor Neutral Cleaner which is a pH neutral tile cleaning product which can be used daily if required. It’s a highly effective cleaning product with a pleasant fragrance and it won’t strip the tiles of the newly applied sealer like most strong household cleaners do. It’s also very concentrated so a small amount goes a long way and a small bottle should last a fair while.


Renovating Terracotta Pamment Floor Tiles in Norfolk

Terracotta Pamment Floor Deep Cleaned and Sealed at South Creake Fakenham Read More »

Yellow Clay Tiled Floor Before After Restoration Tacolneston

Renovating a Yellow Clay Tiled Floor in Tacolneston Village

We were contacted by a client who had bought an extensive grade 2 listed property in the village of Tacolneston which they had been renovating gradually. One of the last items on the list was the Yellow clay tiled floor which was laid throughout the large Kitchen and Dining Room and had been sadly neglected over the years.

Although I was unsure of their history these tiles were very similar to Terracotta so I was confident they would respond well to cleaning. The main issue for the client however was that the dark Grey grout lines which were deeply recessed from the surface of the tile and made walking across the floor in bare feet extremely uncomfortable.

Yellow Clay Floor Tiles Before Cleaning Tacolneston

Our original plan was to deep-clean the floor, then key-into the grout with a diamond blade multitool along the grout lines, back fill with additional grout and then seal the floor with a with an acrylic finish sealer that wouldn’t leave the floor too shiny. Things didn’t quite turn out to be quite that straightforward, however.

Cleaning and Re-Grouting a Yellow Clay Tiled Floor

The initial deep-clean was done using Tile Doctor Pro-Clean diluted to a strong 2:1 ratio with hot water and then scrubbed into the floor with a rotary machine fitted firstly with a black nylon stripping pad to clean the tile surface followed by a medium grade nylon brush to get down into the recessed grout lines. The resulting slurry was then power rinsed and extracted away with a Ninja machine.

The surface of the clay tiles had cleaned very well but it quickly became obvious that the grout wasn’t grey at all but was the colour of a typical sand and cement pointing mix; the dark colour was actually a thick layer of grease and dirt which had become trapped in the grout line recess, probably due to many years of ineffective mopping. The pointing mix was clearly very old and had become soft and broken up in most areas across the whole floor.

With this in mind our next job was to remove as much of the loose, powdery pointing as possible with a diamond-bladed multitool. In the end we found that all the pointing had to be taken out completely in order to successfully repoint the floor and provide a consistent appearance. This took some time to do and once removed the and all the remnants vacuumed up, we proceeded to repoint the floor with a flexible and water-resistant limestone-coloured grout which had been chosen by the client.

Yellow Clay Floor Tiles During Grouting Tacolneston Yellow Clay Floor Tiles During Grout Haze Removal Tacolneston

The following day, we returned to remove the grout haze left on the surface of the tiles during repointing and to prepare the floor for sealing by treating the floor to an acidic wash with a solution of Tile Doctor Acid Gel.

Sealing a Yellow Clay Tiled Floor

We left the new grouting to cure fully and returned two days later to apply a sealer which will protect the floor going forward and provide the desired finish. Before doing this the floor was visually inspected and the moisture content of the tiles and grout measured with a damp meter to ensure it had dried. The readings were low and although the building was very old it meant we would still be able to use a combination sealer with acrylic finish as we had originally hoped.

Yellow Clay Floor Tiles After Cleaning Tacolneston

As the client didn’t want the resulting appearance to be too “shiny”, we chose to use Tile Doctor Seal & Go which would give an excellent fluid resistant seal to both tile and grout with a mid-sheen finish. This was applied by hand in five coats which resulted in a very pleasing soft look across the whole floor.

Yellow Clay Floor Tiles Cleaned Grouted Sealed Tacolneston

The client was extremely pleased with what we had achieved and left the following testimonial:
“We could not be happier with the result! From embarrassing black grout and years of footfall damage, Nick and Sally have transformed our kitchen and dining room terracotta tiles into a thing of beauty! Many thanks for all your hard work and extra hours put in, I will be recommending your services to everyone :)”


Professional Restoration of a Yellow Clay Tiled Floor in Norfolk

Renovating a Yellow Clay Tiled Floor in Tacolneston Village Read More »

Large Terracotta Tiled Floor Before After Cleaning Docking

Flood Damaged Terracotta Tiled Kitchen Floor Rescued in Docking

Luckily for this client in the village of Docking in Norfolk, the water pipe under her kitchen sink burst the day before she left for a four-week holiday in the USA, so at least she was able to turn the water off at the mains and minimise the damage before leaving for the airport… every cloud, as they say!

On her return she found that the Terracotta tiled flooring had dried out perfectly but unfortunately, the acrylic sealer had suffered badly as the evaporating moisture came up through it and the entire surface of the floor had developed a milky-white bloom. Our client thought that complete replacement of the whole floor, which ran from a large kitchen diner through to a long utility room with separate storage cupboards and a WC would be the only option. Fortunately, before investigating that expensive option she gave Tile Doctor a call in the hope that the floor could be saved.

Large Terracotta Tiled Floor Before Cleaning Docking

Deep Cleaning Water Damaged Terracotta Floor Tiles

In order to remove the damaged acrylic sealer, we applied a strong dilution (1:2) of Tile Doctor Pro-Clean mixed with a little Tile Doctor Remove and Go. This was scrubbed in along with a small amount of honing powder using our 17″ rotary machine fitted with a medium nylon brush before being power rinsed and extracted to remove all the chemicals and resulting slurry.

The grout lines, corners and edges where the original sealer had been applied more thickly were then further cleaned by hand with Tile Doctor Nanotech HBU Remover, HBU stands for Heavy Build-Up and this is a useful product for tackling stubborn areas.

The floor was then finished off with very fine honing powder applied with water and a black scrubbing pad before being rinsed and extracted again. Finally, the whole floor was acid washed with Tile Doctor Acid Gel to neutralise all remaining cleaning agents and counter act any efflorescence salts which may appear in the future before being left to dry thoroughly overnight with the assistance of our dehumidifier.

Sealing Terracotta Floor Tiles in Docking

On our return the following day, the floor was thoroughly damp tested and found to have dried extremely well enabling us to start applying the new sealer straight away. The client had specified a muted shine surface for her floor, so we chose to use Tile Doctor Seal and Go.

Terracotta is made from clay which is quite a porous material so seven coats were needed to completely seal the floor. This would provide optimum fluid resistance along with the mid-sheen finish she had requested.

Here’s what the client had to say when we’d finished:

I am delighted with the work carried out. The terracotta tile floor of my kitchen was in a terrible state following a flood and it has been restored to an excellent condition. A very professional and personal service which I am happy to recommend.

Large Terracotta Tiled Floor After Cleaning Docking
 

Renovating Terracotta Floor Tiles in Norfolk

Flood Damaged Terracotta Tiled Kitchen Floor Rescued in Docking Read More »

Terracotta Tiled Kitchen Floor Before After Cleaning Hales

Dirty Terracotta Floor Tiles Cleaned and Sealed in Hales

How the Terracotta floor tiles at this property in the Village of Hales, Norfolk became quite so comprehensively dirty in so short a time, we will never know. We were contacted by the new owner, a lady who had become so distressed by the state of the floor in the house she had recently bought that she was seriously considering ripping up the entire area of tiling and replacing it. Remarkable particularly because the property had been restored only a couple of years ago, the kitchen and hallway being laid with new terracotta tiles.

The entire surface was deeply ingrained with soiling and the pointing lines were filthy, despite there being evidence of some kind of topical sealer having been applied at the time of installation. It quickly became obvious during testing that the sealer had been applied very sparingly and had mostly worn away, leaving a badly compromised fluid and soiling resistance with a dull and dirty finish which refused to clean up when mopped.

Terracotta Tiled Kitchen Floor Before Cleaning Hales

Deep Cleaning Terracotta Floor Tile in Hales

The tiles turned out to be made of a fairly soft terracotta which meant that we were able to deep-clean them extremely effectively using a strong dilution of Tile Doctor Pro-Clean (one part Pro-Clean to two parts water). A strong dilution was required to remove what remained of the old sealer in the less used areas and strip the surface back to the bare tile.

The Pro-Clean was left to soak into the floor for about ten minutes before being worked in using our heavy rotary machine fitted with a black scrubbing pad. The resulting slurry being power rinsed and vacuumed away with our 400psi Ninja machine. All the dirt and virtually all of the old sealer was removed at this stage; the remaining patches around the edges of the area being finished by hand with a 200-grit hand-held burnishing block. The pointing lines were then cleaned by hand with neat Pro-Clean and an angled grout brush.

Finally, the deep-seated oil stains in front of the cooker were brought out using Tile Doctor Oxy-Gel which was left to dwell on the marks for an hour before being agitated with a diamond burnishing pad and rinsed away with the Ninja machine. The floor was then left to dry thoroughly overnight with assistance from our dehumidifier.

Sealing Terracotta Floor Tile in Hales

Owing to the softness and consequently high porosity of the substrate, we realised that it could take up to ten coats or more of our chosen sealer in order to achieve the level of shine our client had requested so that the daily mopping would be effective.

Our usual solution to enable us to complete the work in one day would be to apply a coat of penetrating Tile Doctor Colour Grow sealer to the tiles first, followed by up to five coats of topical sealer which would provide the finish, but because our client loved the new lighter colour of the cleaned tiles, Colour Grow was not an option as it is designed to enrich and thereby slightly darken the colour.

The solution therefore was to apply a single coat of Tile Doctor Ultra-Seal which, like Colour Grow, is a solvent-based penetrating sealer but doesn’t alter the colour of the material. This was followed by five coats of Seal & Go to further improve the fluid resistance and provide the mid-sheen finish required.

Terracotta Tiled Kitchen Floor After Cleaning Hales
At the end of the job we had a very happy client whose actual words were: “thank you so much for restoring my faith in my floor!”

Renovating Terracotta Floor Tiles in Norfolk

Dirty Terracotta Floor Tiles Cleaned and Sealed in Hales Read More »

Pamment Dining Room Floor Tiles Before After Cleaning Wymondham

Restoring an 18th Century Norfolk Pamment Tiled Floor in Wymondham

The client’s requirement for this particular job was to clean and restore a very old and porous Pamment tiled floor in the dining room of an old house in the Norfolk Market town of Wymondham. My client impressed upon me the need to restore the floor without removing any of its considerable character and to provide a high degree of fluid and stain resistance which I was confident would not be an issue having worked on similar floors before.

Pamment Dining Room Floor Tiles Before Cleaning Wymondham
The floor originally dated from the late 18th century and had clearly suffered many years of abuse and neglect; there was evidence that at one time, the entire area had been covered by linoleum which appeared to have been stuck down with a type of hide glue, leaving large patches of the adhesive firmly stuck to the surface of the tiles.

Pamment tiles are very popular in Suffolk and Norfolk homes and I often come across them; they are made from clay and, like Terracotta, are porous and therefore need to be sealed to prevent ingrained dirt. Pamments are quite versatile however and can be used for internal floors and external surfaces like patios.

Cleaning a Pamment tiled floor

The first stage of the renovation was to apply a strong dilution (1:2) of Tile Doctor Pro-Clean to the whole area which was scrubbed in with a rotary machine fitted with a black scrubbing pad. The resulting slurry was power-rinsed and vacuumed away using our Ninja machine which makes light work of these tasks.

Tile Doctor Remove & Go was then applied to the remaining patches of paint and glue and allowed to remain in contact for thirty minutes before being scrubbed again with the black pad and rinsed with clean water. A few particularly stubborn glue patches were finally dispatched by steaming after the application of Tile Doctor Nanotech HBU Remover. The cleaning being complete, the odd bits of missing pointing were replaced using a grey-coloured fast-cure compound and the whole area was left to dry thoroughly overnight with the assistance of our large capacity dehumidifier.

Sealing a Pamment tiled floor

Returning the following day, the floor was tested for moisture content using a damp meter to ensure that the chosen sealer’s performance wouldn’t be adversely affected by the presence of too much water in the substrate, particularly bearing in mind that there certainly wouldn’t be a damp proof membrane present in a floor of this age.

The dehumidifier has done its job and I was able to start the sealing process with a single coat of Tile Doctor Colour Grow which is an impregnating sealer that works by occupying the pores in the tile so dirt cannot. Colour Grow is also a moisture-tolerant, breathable sealer that has the additional benefit of enhancing the colours within this kiln-fired tile without affecting the look and feel of the surface.

Our clients had said that they would prefer a slight shine to the flooring if possible, so a further three coats of Tile Doctor Seal & Go were then applied to the whole area which provided maximum fluid resistance with a mid-sheen finish which would make daily cleaning much easier and more effective.

Pamment Dining Room Floor Tiles After Cleaning Wymondham
The client was really pleased with the transformation and left the following comment.
“Almost unbelievable; the results are far beyond what we hoped might be possible with our badly neglected dining room floor. Many, many thanks.”

Deep Cleaning and Restoration of Old Pamment Tiles in Norfolk

Restoring an 18th Century Norfolk Pamment Tiled Floor in Wymondham Read More »

Terracotta Floor Tiles Before After Renovation St Andrews Church Eaton Norfolk

Terracotta Tiled Church Floor Renovated in Eaton Village

St Andrews church serves a large congregation in Eaton Village which is located just outside the city of Norwich on the south side. A sizeable extension was built onto the old church in the 1980s to accommodate the ever-increasing number of people wanting to attend and it was in this part of the building where a problem had developed with the Terracotta tiled flooring.

The tiles chosen by the architect were made from a surprisingly soft terracotta clay which had been sealed with an oil-based product (probably Osmo Polyx Oil or similar) but the coating generally had worn away badly, particularly along the main foot traffic lane up the aisle to the altar. The overall appearance was extremely tired and dull with wide lanes of ground-in dirt.

The clients asked us to clean the floor and replace the thin oil finish with something more durable and easy to maintain.

Terracotta Floor Tiles Before Renovation St Andrews Church Eaton Norfolk

Deep Cleaning Terracotta Church Tiles

Our first job was to remove the now very patchy finish and deep-clean the entire surface of the floor. This was achieved using a strong solution of Tile Doctor Pro Clean mixed with a generous quantity of Tile Doctor Remove & Go. The combined solution was left to soak into the Terracotta tile and grout for about twenty minutes before being agitated with a green scrubbing pad fitted to our rotary machine. The tile was so soft I felt that a black pad would probably have been too harsh and may have damaged some of the religious symbols which had been moulded into a number of individual tiles.

The resulting clay, dirt and sealer slurry was then power rinsed and vacuumed away with our Ninja machine. These machines force hot water under high pressure onto the floor and then extracts the resulting soiled water away with suction. It was an expensive investment for the company, but it certainly makes work like this much easier.

Any remaining soiling in the grout lines was removed by hand using Tile Doctor Oxy-Gel which is a more powerful but manageable gel form of Pro Clean. Also, there were a few really stubborn areas in the corners where the oil finish had pooled and hardened during application. To deal with these and completely remove the shiny patches it was necessary to use a 100-grit hand-held diamond block.

After a final rinse to remove any trace of cleaning product the whole floor was left to dry off overnight, assisted by two industrial fans and a commercial dehumidifier.

Sealing Terracotta Church Tiles in Eaton village

On returning to the church after the previous day’s cleaning, we spot tested the tiles across the whole floor area and found that the fans and dehumidifier had done their job and the substrate was easily dry enough to accept a sealer. We knew that a damp proof membrane had been laid under the floor at the point of installation, so moisture ingress wasn’t going to be a problem. What was an issue however was the high porosity of the clay tile now that it had been stripped of ingrained dirt and the old sealer.

I usually apply Tile Doctor Seal and Go to Terracotta tiles as it leaves the floor with an attractive subtle sheen, however we realised that the floor would probably soak up around a dozen coats or more if applied directly. With this in mind we decided to start with the application of two base coats of Tile Doctor Colour Grow. Colour Grow is a penetrating sealer that would occupy the pores of the Terracotta tile, protecting it from within whilst enhancing the natural colour of the clay at the same time. This was then followed by six coats of Seal and Go which enabled us to achieve the desired level of durability and sheen.

Terracotta Floor Tiles After Renovation St Andrews Church Eaton Norfolk
When we had finished the work, this is what the client had to say:

“After careful consideration of several contractors, it was decided that Nicholas White provided the most sympathetic solution to our flooring needs and at a competitive price. The work was completed as promised with minimum fuss. At all times Nicholas and his staff worked in a professional manner and were totally respectful of their sensitive surroundings.

We were very satisfied with the final work and would have no hesitation in recommending this contractor to other potential clients. J Holmes, Warden St Andrews Eaton.”

Terracotta Church Floor Renovation in Norfolk

Terracotta Tiled Church Floor Renovated in Eaton Village Read More »

=================================

Norfolk Tile Doctor

================================= Read More »

Scroll to Top